
Cottage Rose – Colour Challenge Around the World on Wednesday
![]()
Cottage Rose is a favourite stamp set from the Stampin’ Up!® Annual Catalogue. It comes bundled with the Cottage Flowers Dies and is what I am using for our Colour Challenge with a difference Around the World on Wednesday Blog Hop for March.

Welcome once again to Around the World on Wednesday Blog Hop, travelling around the world through every time zone. You may be starting here or you may have come from the blog of the wonderful Cazz Boylan … isn’t her work just fabulous?!!
Around the World on Wednesday Blog Hop is the brainchild of Angie McKenzie, a wonderful friend and amazing paper artist. My name is Cheryll Miller, and I am so delighted to be a part of this varied and talented group of Stampin’ Up! Demonstrators.

This month, we are creating for a colour challenge. A quick survey amongst our design team members revealed our favourite colours from the Stampin’ Up!® colour range. Aren’t they pretty all together like this? We were asked to use at least three, but more if we liked, of these colours in our projects. Oh, imagine the possibilities!! I am going to have so much fun hopping around all the blogs and seeing what colours everyone chose to use in their projects!
Here is my project, and the colours I chose to use ….

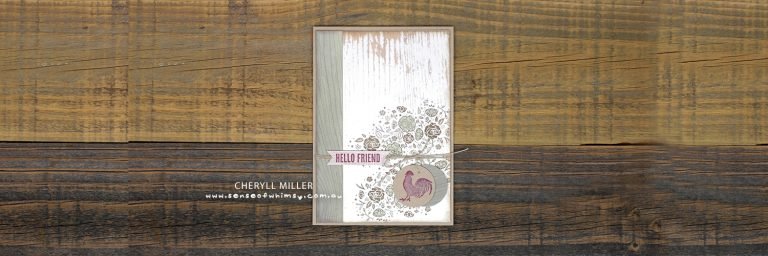
Cottage Rose Bundle ….
I haven’t used this gorgeous bundle for a while … it was perfect for the technique I am showcasing for this project, using White Craft ink as a base colouring tool to allow me to colour an image on dark cardstock.

Colouring with White Craft Ink …
I chose Bermuda Bay cardstock to stamp on … a darker shade which normally would affect the colours and be very muted if you coloured onto the cardstock directly. To make your colours pop and be more to true tone, colour with a base of White Craft ink and allow to dry before adding your chosen colours over the top.

I chose to colour my flower with Rich Razzleberry Ink and Mint Macaron inks.
- Step 1 – Stamp and heat emboss your image with White Embossing Powder.
- Step 2 – Colour the image with White Craft Ink … I keep old, dried out Blender Pens for this task. Works a treat. Allow the ink to dry (takes a little while depending on how thickly you have applied the ink).
- Step 3 – Use a water brush (or blender pen) to add regular ink colour over the craft ink. The ink you are applying will mix with the craft ink to form a “milky” shade. I recommend cleaning your water brush or blender pen of on paper towel before loading up more colour to remove some of the white craft ink from the brush/pen, or the colour gets too “milky” … unless of course you like that paler look.
- Step 4 – Allow to dry and then polish lightly with a tissue or clean, soft cloth to remove any ink remaining on the heat embossed outlines.

Close up images are always a bit scarey!! But here they are, warts and all! 🙂

I have used Pool party cardstock as a matting layer and Coastal Cabana cardstock as my base, folded card. I repeat stamped leaves from Cottage Rose stamp set all over the front of the Coastal Cabana base card in Coastal Cabana ink.
The sentiment is white embossed onto a strip of White Vellum and folded around the top layer.
The embellishments are various clear adhesive embellishments, coloured up with Rich Razzleberry Stampin’ Blend.

I decorated the inside of the card with dies from the Cottage Flowers Dies, die cut from white card and coloured with Rich Razzleberry and Bermuda Bay Stampin’ Blends. This is a detailed die, but I kept all the little pieces to glue back into the die to give it a “fuller” look.

Next up we are are going to take a trip all the way across the Nullabor plain to Melissa Gifford’s blog … can’t wait to see what Melissa has created. In fact, I cannot wait to hop through all the links and check out what colours everyone chose to use.

Here is the full list of blog hop participants this month.
Jan Clothier – NZ
Leonie Stuart – AU
Rochelle Laird-Smith – AU
Cazz Boylan – AU
Cheryll Miller – AU
Melissa Gifford – AU
Danielle Kassing – NL
Aurélie Fabre – FR
Mikaela Titheridge – UK
Annette Ball – CA
Wendy Lee – US
Shel Anderson – CA
Chris Smith – US
Tricia Butts – US
I love all your comments, thank you so much for your continued support of my little creative outlet here at Sense of Whimsy. See you again soon.
xx Cheryll


This is just beautiful Cheryll. Love the technique on this x
Thanks so much Rochelle! xx
WWOW ! this card is fabulous !
Thank you so much Aurélie. xxx
This is so gorgeous! Thank you for sharing and explaining the technique!
Thanks so much Danielle. xxx
Wow! this is stunning Cheryll, I love all these colours together and the Razzleberry flowers are beautiful.
Thanks so much Melissa! xx
Lovely card! Great way to show case this technique – and a lovely choice of colours too.
Thank you so much Jan! xx
Gorgeous!
Thanks so much Shel! xx
So pretty Cheryll. Love that you pulled in so many shades of the colors. They work brilliantly together.
Thanks so much Wendy! xx
Beautiful technique and it looks great on the Bermuda Bay. Lovely card Cheryll x
Thanks so much Rochelle! xx
Oh this is gorgeous Cheryl! I love your colour combination and that flower just pops off the page xo
Thanks so much Cazz! xx
These colours work sooooo well in this beautiful card. Just gorgeous x
Thanks so much Mikaela! xx