
Creating Kindness Design Team Blog Hop – November Fancy Fold Cards
![]()
Very Versailles Stamp Set and a Double Z Fold Card.

Welcome to the Creating Kindness Design Team Blog Hop for November. My name is Cheryll Miller, and I am so delighted to hop with this fabulous group of artists each month. We are featuring “Fancy Folds” this month. Our guest designer this month is Sue Plote and you can find her at This Pink Rooster. You may have come to me from Jay Soriano’s blog, Mitosu Crafts … isn’t Jay amazing?!
Double Z Fold Card
I am usually a straight up, four sides, one fold card project girl … so fancy folds require a little bit of a creative mind shift for me! The Double Fold Z Card is an easy one, not too many measurements to muck up.

I have created diagrams in both metric and imperial for this card fold.
- Cut the base card 24.4cm x 10.5cm. Score at 7cm and 14cm. Fold at the 14cm score line and then fold the 7cm score in the opposite direction. This forms the base z-fold.
- Cut a strip of card 24.4cm x 4cm. Score at 7cm and 14cm. Fold at the 7cm score line and then fold the 14cm score in the opposite direction. This forms the second z-fold strip.
- The decorative panel measurements are:
Front Panel – 6.5cm x 10cm
Inside Panel – 10cm x 10cm
Strip Panels – 10cm x 3.5cm, 6.5cm x 3.5cm, 6.5cm x 3.5cm
- Cut the base card 9-1/2″ x 4-1/4″. Score at 2-3/4″ and 5-1/2″. Fold at the 5-1/2″ score line and then fold the 2-3/4″ score in the opposite direction. This forms the base z-fold.
- Cut a strip of card 9-1/2″ x 1-1/2″. Score at 2-3/4″ and 5-1/2″. Fold at the 2-3/4″ score line and then fold the 5-1/2″ score in the opposite direction. This forms the second z-fold strip.
- The decorative panel measurements are:
Front Panel – 2-5/8″ x 4-1/8″
Inside Panel – 4-1/8″ x 4-1/8″
Strip Panels – 4-1/8″ x 1-3/8″, 2-5/8″ x 1-3/8″, 2-5/8″ x 1-3/8″
You could decorate the panels with a mixture of Designer Series Paper and some stamped panels, however I have elected to sponge colour onto my panels. I sponged inks onto larger Whisper White pieces and then trimmed the cardstock to the size required.

I like the way this card folds flat into a neat square, and while it would be great with a custom made square envelope, it still fits into a standard sized envelope for mailing. I have calculated measurements so that the front panel is a little wider than half the square to give me a little more space to feature the images.
I also didn’t want to cover over that lovely feature panel on the front with the band, so I adhered the Gorgeous Grape strip to the front panel before I adhered the front feature piece, then I trimmed the purple/aqua strip with the Everyday Label Punch and adhered it on last. The Z Fold is still very secure and there is a nice little decorative element on the strip.
Very Versailles Stamp Set
Speaking of images, I am featuring the Very Versailles Stamp Set in this project.

These soft and feminine images are some of my favourites, especially that tumble of leaves! I have featured them on the various panels of the card, stamped in either Gorgeous Grape or Delicata Golden Glitz inks. If you really like the Delicata inks, you will need to get in and order them quickly as once current stocks with Stampin’ Up! area depleted, they won’t be re-stocked.

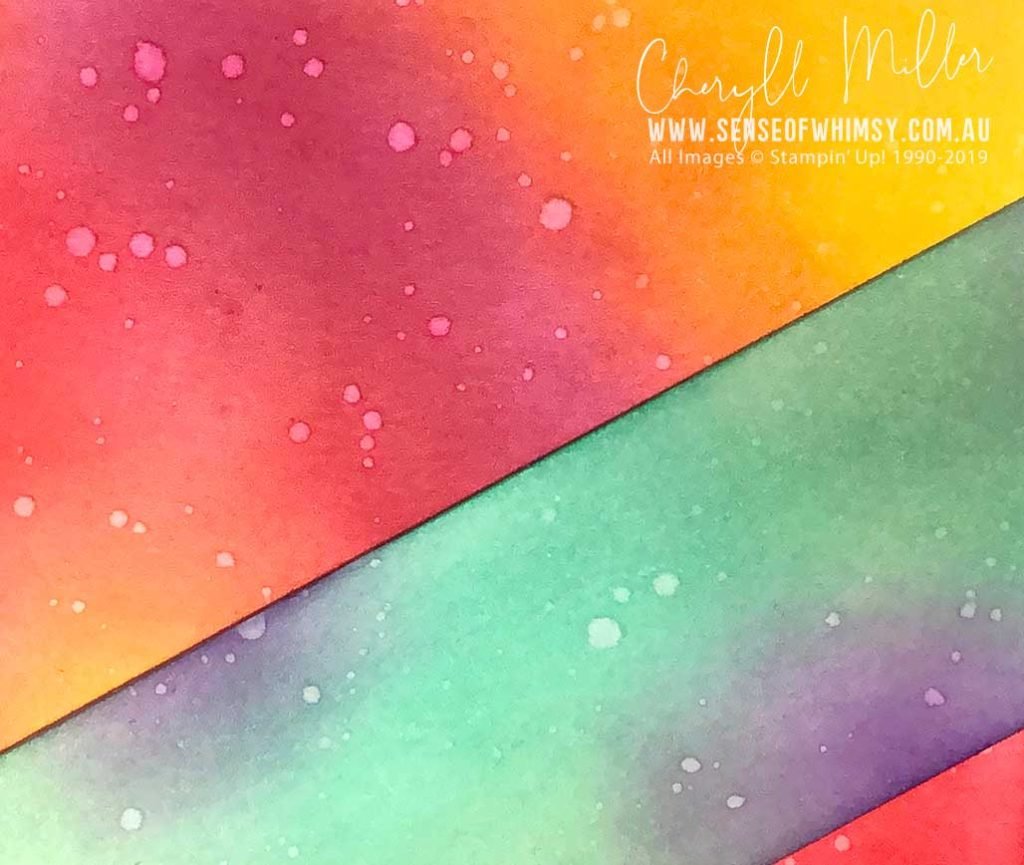
I am using a colour scheme from Colour INKspirations Challenges for this card. This is an interesting colour scheme that is for sure, six very bright colours. Using them all together was challenging, and so I have split the colours into two groups. For the larger panels I have sponged Pineapple Punch, Poppy Parade and Lovely Lipstick. For the small panels on the second Z strip, I sponged Mint Macaron, Coastal Cabana and Gorgeous Grape. While the ink was still wet, I splattered the pieces with water, which lifts some of the colour where the splatters fall.
And can I just say that Pineapple Punch is an amazing ink to sponge with. I don’t use this colour much but it has many faces … it starts off quite light (almost fluoro), and then deepens and intensifies as you add more ink. It could also be that the sponge was picking up some of the Poppy Parade and Lovely Lipstick, but I am really loving that intense, bright yellow.
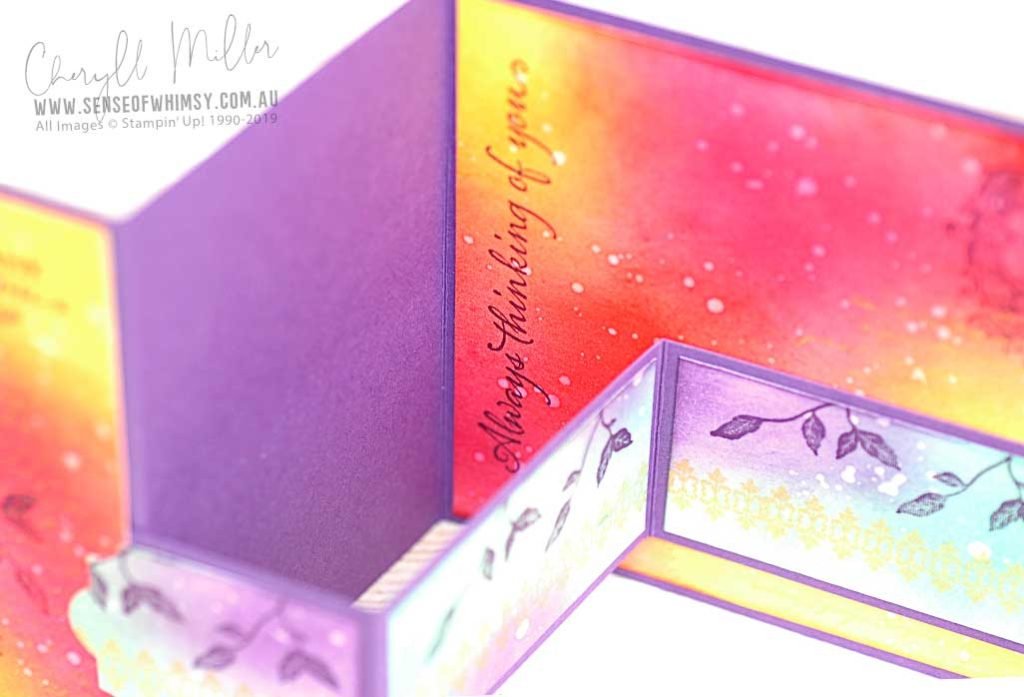
As a little extra surprise touch, I have added the inside greeting along the inside fold. And a panel is adhered to the back of the card for adding your own personal greeting .

I hope you have enjoyed this tutorial. I am sure the other girls will have something far more exciting in the way of Fancy Fold cards, so make sure you check them all out. Next up on the list is the fabulous Danielle Bennenk.

Blog Hop Participants
- Sue Plote – Guest Designer – USA
- Tanya Boser – USA
- Marcy Denning – Canada
- Paula Dobson – New Zealand
- Lou Kitzelman – Australia
- Jenny Hall – USA
- Jay Soriano – UK
- Cheryll Miller – Australia
- Danielle Bennenk – Netherlands
- Charlet Mallett – USA
Some of the team members have prepared videos for you …. here is the video hop list:
Video Hop Participant List:
1. Tanya Boser – https://youtu.be/vNj1cfPzJhs
2. Marcy Denning – https://youtu.be/tRBSqRvm7nA
3. Jay Soriano – https://youtu.be/rRxy6nzGdaA
4. Danielle Bennenk – https://youtu.be/tKxqTYxQPj4
xxxx
Cheryll
Join Stampin’ Up!® to get a 20% discount on your crafting purchases. CLICK HERE!
Subscribe to my newsletter to keep up to date with the latest news: CLICK HERE!
If you would like to stay in touch via Facebook: CLICK HERE!
Follow me on Instagram: CLICK HERE!
 |  | |||
 |  |  | ||
 Stamping Sponges [101610] $6.00 |  |


Oh how delicious! This is really fabulous Cheryll. Your ink blending is on point. I love that your great card fold shows it off! Thanks also for joining in our challenge at Colour INKspirstion. x
Thanks Lou … Sponging/blending has always been something I love doing! And thanks to Colour Inkspiration for giving me the colour challenge because I would never have thought to put these colours together otherwise! xx
A gorgeous card Cheryll just love the sponging xxxx
Thanks so much Colleen! xx
I couldn’t love this sweet card more! And your colour choices!! *swoon*
Hey Paula, thank you! I can’t take credit for the colour choices … this was from the current Colour Inkspiration challenge! I did very much enjoy taking the colours to their utmost intensity though! 🙂 xx
Oh how fun!!! Love it! xx
Thanks Angie … add lots of ink to a fun fold and I can probably do a few more of these type of cards!! 🙂 xx
So pretty Cheryll! Your background is awesome and I must say those colors really pop and look great again the z. Big hugs!
Thanks so much Charlet … love hopping with you! xx