Stamping Sunday Blog Hop – Texture Time
![]()

Welcome to my blog on this second
Beginner, Casual and Avid Crafters
Showcasing how products can be suitable for all levels of crafter has been a focus with Stampin’ Up!® for a few years now, and something we do regularly with the Stamping Sunday Blog Hop teams.
A beginner crafter is someone who is new to stamping, and will be looking to create with just inks, stamps and paper.
A casual crafter is someone who thinks that this papercrafting lark is pretty good and is keen to move beyond the basic supplies, maybe get a punch or two … or even invest in a diecutting machine.
An avid crafter is feeling the passion, knows that getting into the craft room is an inexpensive form of therapy, and is accumulating lots of “things”. Of course, she wants to use them all and doesn’t blink an eye at taking an hour to make a card! 😉

Which type of crafter are you?
Parisian Flourish Beginner Project
All my projects today start with a piece of black card and the Parisian Flourish 3D Embossing Folder.
All my projects also feature ribbon which has been manipulated in some way to create texture or a point of difference.

For my beginner project, I have simply embossed that piece of black card with the Parisian Flourish 3D Embossing folder and layered it onto a Petal Pink layer and a Gray Granite folded card.
I have used two ribbons on this card … the Petal Pink Organdy Striped ribbon has been pleated (each pleat is held in place with glue dots), and then Gray Granite Shimmer Ribbon has been adhere centrally onto the pink ribbon.

The sentiment is from the Lovely You stamp set, stamped in black on Petal Pink card and then punched out with the Lovely Labels Pick a Punch. To finish off, I have added some of the Petal Pink faceted gems from the Elegant Faceted Gems et.
Parisian Flourish Casual Project

For my stepped up Casual Card, I took that same black embossed piece of card and lightly sponged it with a mixture of White Craft Ink Refill and Gray Granite ink refill. If you keep your touch light, you will highlight the raised areas and have the original black show through in the background.

Isn’t it gorgeous?? This technique really shows of the wonderful flourishes in the embossing folder.

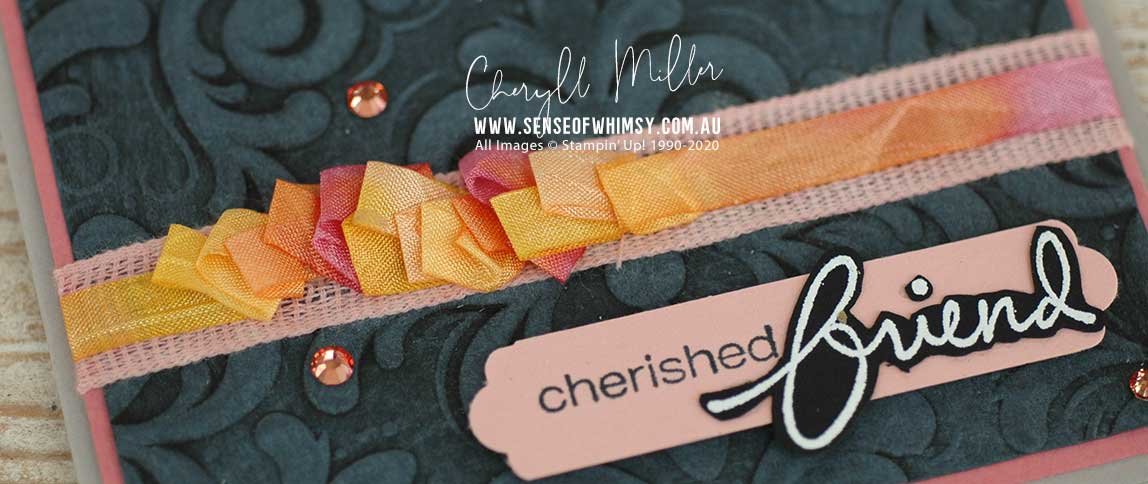
For my ribbon, I coloured up some of the cotton ribbon from the Forever Greenery Trim Combo Pack with a little bit of Rococo Rose ink refill and rubbing alcohol. Ad then the Whisper White Crinkled Seam Binding Ribbon has been coloured up with a variety of yellow, orange and pink Stampin’ Blends and I have haphazardly pleated it over the top of the cotton ribbon.
Again the sentiment is from the Lovely You stamp set, stepped up a little bit with a separate embossed portion. The gems are the Champagne Faceted Gems, coloured up with the Rococo Rose Stampin’ Blend.
I have layered the embossed piece onto Rococo Rose cardstock and then onto a folded Gray Granite card.
Parisian Flourish Avid Project

For my avid project, I took that embossed Basic Black piece, which had been lightly sponged with the mix of Whisper White Craft ink and Gray Granite ink refill, and added another layer of ink. I mixed up some Champagne Mist Shimmer Paint and Gray Granite ink refill and then very lightly sponged this mix over the top of the embossed card. Not only did this add an amazing layer of shimmer, it slightly changed the colour tone, making me think of Pretty Peacock.

It is difficult to show the shimmer in a photograph, it is truly gorgeous and as long as you keep the application very light, you can also see the previous layer of Whisper White/Gray Granite and then the touches of the original black cardstock. I love it!!!

So I ran with that and layered into onto a Pretty Peacock layer, and then onto a Gray Granite folded card.
The ribbon is the Pretty Peacock Scalloped Linen Ribbon, but all we really see is the beautiful lacy edge. I coloured up some more of that Whisper White Crinkled Seam Binding with the light Pretty Peacock Stampin’ Blend … which is pretty enough on it’s own, but I also added a layer of Champagne Mist Shimmer Paint … I just rubbed it on with my fingers, messy but satisfying. I tied the coloured up ribbon around the card with some braided linen trim, and into pretty bows on the front of the card. I did use glue dots to assist in holding all the ribbons together.

Again, I selected a sentiment from the beautiful Lovely You stamp set, making a feature of the script part of the sentiment. The very subtle little addition of bling is some of the clear Elegant Faceted Gems coloured up with the Dark Pretty Peacock Stampin’ Blend.
The Stamping Sunday Design Team…
I am really looking forward to seeing what the rest of the design team members choose to create texture on their projects . Here is the full list of hop participants … visit them all and be inspired.
xx
Cheryll


Stunning projects Cheryll, I love the colours in the Crinkled Ribbon and the shimmer on the embossed panel. They are amazing cards!
Thanks so much Vicki! xx
Great cards Cheryll
Thanks Colleen! xx
Be still my heart! These projects are exquisite!!! Love the colored and pleated ribbon, how you highlighted the embossing, and the shimmer everywhere!!! Gorgeous!
Thanks so much Tami! You don’t know how much it means to me when you leave such lovely comments … I am such a big fan of yours!! xxx
Amazing coloring of the embossing folder, Cheryll! I love your description of the three levels of crafters.
Thanks Su! 🙂 xxx
Oh Cheryll!! That ribbon…it had me before I even saw a full photo of the projects. Each way you’ve used it is gorgeous. And the multicolored seam binding is a must try!
Thanks Sara! 12 hours ago, I didn’t even know what I was creating for the hop! A fun filled textural, ribbony day! 🙂 xxx