Creating Kindness Design Team Blog Hop – Landscapes
![]()
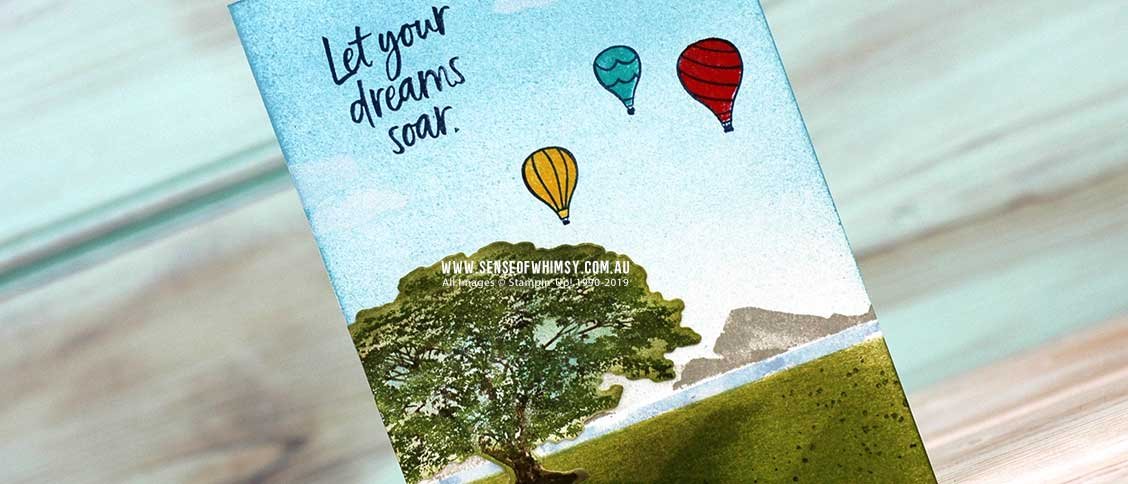
A landscape card can be created with many different stamp sets. Here I have used Above the Clouds, Rooted in Nature and Waterfront for the Creating Kindness Design Team June Blog Hop.

Welcome to the Creating Kindness Design Team Blog Hop for June. The theme of the hop this month is “Landscape card”. Our guest designer this month is Eva Dobilas! Eva’s blog is https://ilovetostamp.com/ and it is well worth a visit! I have the pleasure to work with Eva on a Tutorial Bundle and I am very excited to see her project for this hop.
Above the Clouds
I didn’t realise until after I created this card, but I also used the Above the Clouds stamp set in last month’s hop! It is a new set from the brand spanking new 2019-2020 Stampin’ Up! Annual Catalogue. I obviously like it!

I also used a few other stamp sets …. Rooted in Nature and Waterfront. Hey … they are on the shelf, why not use ’em all!

Creating a Landscape Card
When I create landscapes, I usually find a photograph or image that I want to try and replicate with stamps. This helps me create perspective. Finding the right stamps to do that is a fun challenge. For me the trick is to create as I go and roll with the things that don’t quite work.
I decided to make this post a step by step of the creative process, showing the good, the bad and the ugly. I quite like the end result … there were some points I wanted to bin the whole thing, but perseverance paid off. So be warned, sometimes up close and personal can be confronting for those of you who like structure and order! *wink*
Waterfront
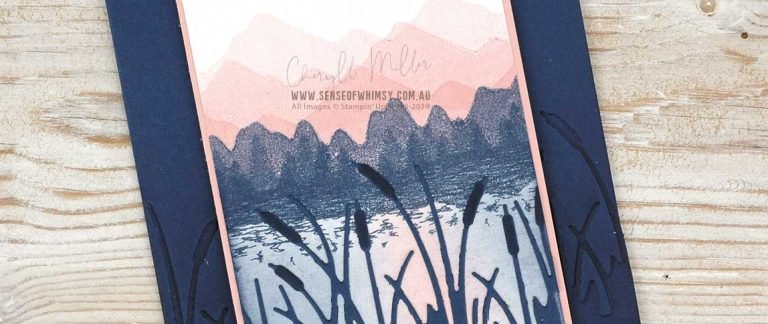
The Waterfront Stamp Set is ideal to create scenes. I used the mountain image and to get the perspective of mountains in the distance, I masked a horizon line with a Post It Note so I could just stamp a portion of the mountains using Gray Granite ink.

Reversing the Post it Note mask helps create a lake in front of the mountains using Seaside Spray ink (stamped off).

And voila … it’s the start of the scene.

A little masking over the stamped images to protect them and brayering on some Old Olive ink, creates green grass in the foreground.

I did create a custom mask from a Post It Note to use when brayering additional green ink over the “paddocks” … I used Mossy Meadow and Granny Apple Green. This was the first point where I nearly threw the lot in the bin. It all looked out of perspective, but I decided to see how the inks faded back before giving up.

Brayering in the sky with Balmy Blue Ink, I applied ink at the top of the page and gradually worked downwards until the ink faded into nothing. I repeated this process until the colour was the depth I wanted.

I used the Stamparatus to stamp the small trio of hot air balloons, inking each one in a different colour. The Stamparatus makes stamping the detailed images over the top with Night of Navy ink dead easy!

Rooted in Nature
I forgot to photograph the next step … I stamped the large tree from Rooted in Nature stamp set using the Stamparatus and Stampin’ Write Markers direct to stamp to colour the image. Using the markers allows the build up of colour in selected areas. After die cutting the tree, it has a white edge all the way around, which didn’t look very natural. I sponged the edges with Old Olive and Mossy Meadow ink and I also sponged over the tree with Balmy Blue and Old Olive ink so that there was no stark white showing.

In hindsight, I could have sponged the colours onto the tree a little more carefully taking into consideration where the image would sit on the landscape (i.e. sponging in Soft Seaspray where the tree trunk sits over the lake). However, by this stage, I had already glued the tree onto the card front and so short of starting again, I had to run with it. **Note: design change … to place the whole tree on the card front would have covered over one of the balloons and most of the mountains. The solution was to adhere the tree off to the side and trim off the bit that hung off the edge of the card.
I stamped one of the wonderful sentiments from the Above the Clouds stamp set directly onto the card front with Night of Navy ink. The card still looked a little bare and so I added some clouds from the same set with Whisper White Craft Ink. These clouds needed to be stamped multiple times over the same image to show up well against the light blue sky.

The three clouds come joined together as one stamp in this set, and I believe they will be far more versatile if separated, so I chopped them up into three individual clouds. A different form of “Love it, Chop it”. If you require them to be laid out as per the original stamp, it is easy to place them on the block with the cut edges matching.

Problem Solving
From here on in, things went a little awry and I almost gave up on this card, however some creative problem solving saved the day.
The grassy foreground still didn’t look quite right to me, so I decided to add a shadow under the tree, and one of the stamps from Waterfront seemed to be the perfect fit. I used Gray Granite and stamped off a number of times before stamping onto the card front. Of course, the die cut tree was already adhered and the stamp didn’t connect with paper around the trunk of the tree … so I used a sponge dauber and filled in the patches with Gray Granite ink. And in the process somehow ended up with two spots of liquid in the green, which created two prominent light spots. Eeeek!

I coloured in the dots with a Stampin’ Write Marker … that didn’t work. What to do?
Waterfront stamp set to the rescue… I stamped the splatter image with Mossy Meadow ink over the green areas and disguised those two dark dots. It is not shown here, but I also had to add some texture back into the base of the tree with a Soft Suede Stampin’ Write Marker as I noticed that the shadow stamping had muted that.

So finally, I was happy enough to down tools and say …. ALL DONE!

Whew, that was a good deal of trial and error, but what fun!! Definitely a card for an avid stamper.
Here is the list of the Design Team Members who have created videos this month for the hop. Grab a cuppa and check them all out, you won’t be disappointed.
Video Hop Participant List:
1. Eva Dobilas – https://youtu.be/IMOTfJ_0q9o
2. Charlet Mallett – https://youtu.be/HBwNi4Xo67Y
3. Danielle Bennenk – https://youtu.be/BmFdDpPY7FM
4. Jay Soriano – https://youtu.be/JFyL1GsV75o
5. Jenny Hall – https://youtu.be/4_vxfx9qlwQ
6. Marcy Denning – https://youtu.be/VA-wJo1zKMk
And here is the listing of fabulous paper artists participating in the blog hop this month.
Blog Hop Participants
- Eva Dobilas – Guest Designer – Canada
- Charlet Mallett – USA
- Danielle Bennenk – Netherlands
- Lou Kitzelman – Australia
- Jay Soriano – UK
- Jenny Hall – USA
- Marcy Denning – Canada
- Paula Dobson – New Zealand
- Cheryll Miller – Australia
xxxx
Cheryll


This is a lovely card Cheryll, love the scene you set! x
Thank you Sharryn! xx
Oh Cheryll! You are a master at pulling stamp sets together and creating these fab arty scenes. This is fabulous and should be in a frame! x
Thanks Lou … if only you had seen the chaotic creation process, there are so many layers of ink to this scene to “fix” something! 🙂 xxx
WOW, this is such an amazingly creative and gorgeous card! Love how you pulled together stamps to work together perfectly! Fabulous creation!!
Thanks so much Eva … it was fabulous hopping with you. I loved your landscape card, and love your work generally! 🙂 xx
Simply breathtaking, Cheryll!
Hahaha! Thanks Jenny … as long as you don’t look too closely! 😉 xx