
Sending Smiles Across The Miles for GDP082
![]()
The challenge over at Global Design Project this last week is a sketch challenge.

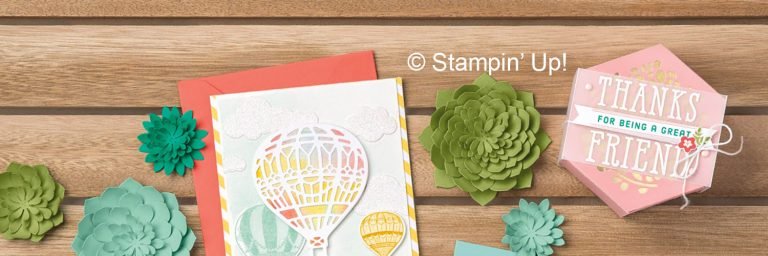
I have gone a little bit off track with my card though. I wanted to use the Lift Me Up stamp set (Wood Mount or Clear Mount) and co-ordinating Up and Away thinlits … however the large intricate balloon die creates a much larger feature element than is on the sketch.

Nevertheless, I ploughed on. Applying a very quick, light blue (Pool Party) watercolour wash to the right hand panel created some sky. The contrast strip is Pool Party diagonal striped Designer Series Paper … as we are now into wind down stage of the 2016-2017 Annual Catalogue and the retiring list has been issued, the Subtles Designer Series Paper Stack is sold out and no longer available. There are some great options coming up in the new catalogue issuing in June 2017 though!
Ooops … sidetracked! Once both panels are adhered to the front of a Basic Gray folded card front, I tied Whisper White Baker’s Twine around the card front to cover the join. I utilised a great idea I saw somewhere in past Global Design Project challenges to hold the twine in place … cutting a small notch in the card front at both ends of the join line. This holds the twine in exactly the right place over that join! Clever!! I can’t remember whose projects utilised this nifty little tip but thank you, thank you!

Moving along, the large intricate hot air balloon piece from the Up and Away Thinlits is die cut out of Basic Gray cardstock. To create a backing for the balloon, I spritzed an 8cm x 10cm piece of Watercolour Paper with water and then applied ink in random blotches with an Aqua Painter in colours of Blushing Bride, Flirty Flamingo and Calypso Coral. Spritzing the card first allows the colours to move and blend more easily. I dry my piece with a heat tool, but if you are patient you can allow to air dry … suffice to say, things are never allowed to air dry in my craft room!
a) I am not patient, and
b) if I leave something alone for even a short length of time in my craft room, the chances of me finding it again are not good!! I have to tie a string to my grand daughter before she steps into the craft room so I can find her again … “What’s all this stuff Nanny?” said with wide eyes and twitching fingers!
Oh, I have digressed again! Can I just say before moving on, that drying with a heat tool also allows you to flatten the piece out by applying heat to both sides of the paper.
Applying a light film of Multipurpose Liquid Glue to the reverse side of the die cut balloon with a sponge makes it easy to adhere onto the now fully dry watercoloured piece of cardstock. The excess watercoloured card is simply trimmed off with scissors. I also used a craft knife to cut out the little square between the balloon and the basket. A quick outlining of the piece with my Basic Gray marker blends in any bits where I haven’t quite trimmed as neatly as I should.
I stamped two of the smallest balloons from the Lift Me Up stamp set onto Watercolour card using Blushing Bride and Calypso Coral inks. Use a clean Aqua Painter to carefully spread the ink on the stamped images … try to keep the ink inside the lines as there is a slight white border around the image when you cut out the balloons with the co-ordinating die. BUT, if ink does spread outside the lines, DON’T PANIC … just go with it and spread the ink outside the lines all the way around the balloon. It just means the little balloons won’t have a white edge, they will have a lightly coloured edge. Using watercolour paper for this technique lets the ink spread nicely, however the quite intricate lines of the image remain clearly visible.
I used the greeting “Sending SMILES across the miles” stamped onto Whisper White card with Basic Gray ink and trimmed into a flagged banner shape. Adding some clouds die cut from Whisper White card and the card is ready to assemble. I kept all the elements grouped together at the top left of the card so that I was at least loosely following the sketch. I was sooooo tempted to put the greeting piece in the lower right hand corner, but I resisted and even though it meant covering up some of that delicious watercoloured hot air balloon, I adhered it quickly before I could change my mind.

There was still something missing though … had I made a big mistake in putting my greeting piece over the balloon?? Comparing my card to the sketch and I noticed the little hearts in the sketch. Using the strip of hearts die from the Everyday Jars Framelits, I die cut lots of gorgeous tiny hearts from the piece of watercoloured card trimmed off the edge of the hot air balloon. Adhering three in the lower right corner, balances the top heavy card without deviating from the sketch too much more than I already have, and adding one heart on the greeting piece ties the two far apart elements together.

I had enough hearts left over to adhere three over a swipe of watercolour on the inside of the card ….

And voila! I went from “I’m really not sure about this” to “I LOVE THIS”. Don’t you just love it when that happens!?
I am getting this post into the Global Design Project just before the cut off, but the great thing about GDP is that the galleries can be visited and marvelled over at any time, so make sure you check out all the wonderful projects submitted this week by clicking here.

Thanks for stopping by.
xx
Cheryll


SUCH A GORGEOUS CARD, CHERYL! I love the colors you’ve used – these balloons work perfectly with this sketch! Such beautiful watercoloring. I, too, adore the notches you’ve added for the twine.
Thanks so much for stopping by and leaving such a lovely comment, Brian! “Brian is in the building!” 🙂
Beautiful card, Cheryll! I love the colors! I also love all the different watercolor techniques you show off on this card and enjoyed all your whimsical descriptions. Thanks for the inspiration!
Haha … thanks Natalie. I had just as much fun writing the blog post as I did creating the card! If only I had hours and hours every day to just waffle about making cards and writing silly blog posts, I would be one very happy girl! 🙂
Wow, I love it! Your card is so beautiful ❤︎
Thank you so much Steffi! Blushing again! xxxx
Wow, gorgeous card Cheryll! Love it!
Thank you so much Liz … xxxx
Beautiful card Cheryll! I love the pop of color on your soft background. Congratulations on your Honorable Mention!!
Thank you Sara … it is so humbling to have such talented stampers stopping by to leave comments! *Blushing* xxx
I love your card ;O)
Thank you for joining us GDP this week!
Thank you Janneke! You are a sweetie! 🙂 xx
Wonderful card Cheryll – we are so happy to see that this bundle is staying around in the next catalogue. Love how you have done the watercoloring and the placement of the balloons to go with the sketch. Thank you for playing along with the Global Design Project this week! We love you playing along with us.
Thank you … the challenges have breathed new life into my cardmaking and blog! 🙂
Oh Cheryll this is gorgeous!! Love everything about it. Thank you for playing along with the Global Design Project this week! We love you playing along with us. xx
Thanks Kylie! xxxx
This is gorgeous and a fabulous interpretation of the challenge. Love the watercolour sky as it gives a context for the balloon without competing with it.
Thank you so much Jan. I had so much fun with this one, nutting out the design as I tried to stay within the sketch parameters! xx