Botanical Blooms – GDP031
![]()
Botanical Blooms Stamp Set … I have had this one for a while, but not really explored it properly. Global Design Project has a theme challenge this week, and the theme is “Nature”. What a perfect opportunity to play around with the Botanical Blooms set and the co-ordinating Botanical Builder Framelits.
And the good news is that these two come as a bundle at a discounted price.

I also wanted to pull out my poor neglected spritzers … I love the sense of the unknown when using spritzers … you never quite know how it will turn out. Here is the final result.

The white frame is created with a stencil applied before spritzing. I love the way the white frame “pops”. I created the stencil frame out of standard weight Whisper White card and two sizes from the Squares Collection Framelits. To attach it to my card while I spritzed, I used the Two Way Glue Pen. Just a couple of swipes … if you let it dry to clear before attaching to your card, the bond is non-permanent.
I spritzed with Calypso Coral and Wild Wasabi spritzers … The trick is to know when to stop, green and pink make brown if it all gets too heavy! I create my spritzers with rubbing alcohol and re-inkers. If you haven’t done this before, check out my really quick video on creating them.
I stamped the background images (also from the Botanical Blooms set) with Archival Black Ink while the frame stencil was still in place.

The big reveal … peeling off the stencil frame is quite exciting. But it looked a little bit boring, so I took a black marker and doodled around the edges really quickly, and to continue the doodle look, I added a quick scalloped border as well. It’s very imprecise, it is very loose and it is FUN! I was totally amazed at how this simple addition really made the frame pop.
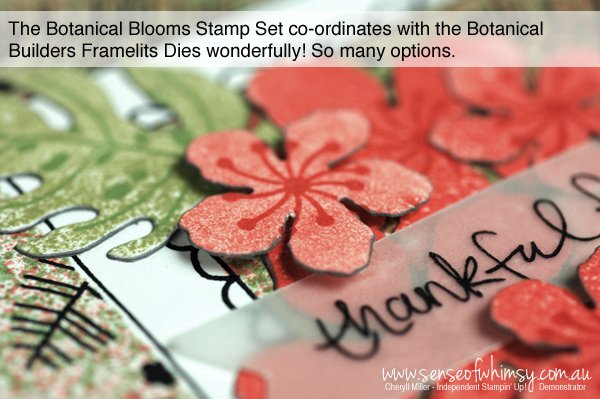
There are a few different options for floral dies in the Botanical Builder Framelit Die set. I chose to stamp the solid flowers and leaf and then die cut them with the co-ordinating framelits. I have used Calypso Coral ink for the flowers, and Pear Pizzazz and Wild Wasabi inks for the leaves. I stamped some images without re-inking to get different tones.

Using a grey marker (Smoky Slate) to run around the edges of the die cut flowers and leaves takes away the white edge (seeing as I stamped these onto white card), and also adds a faux shadow which helps define the flowers, especially when layering tone on tone.

I layered the large flowers and leaves into the frame. The greeting comes from the Sheltering Tree stamp set and the loose, handwritten font totally complements the doodling in the frame. I stamped with black ink onto white vellum so as not to compete with the frame.
To solve the problem of how to adhere the vellum without glue show through *gasp*, I positioned the smaller flowers so that a couple of petals covered the strategically placed mini glue dots, and layered some of the flowers with Stampin’ Dimensionals (cut into teeny weeny pieces) to create height and interest.

I added some doodling to the inside of the card too! Once you start, you can’t stop! The spritz has also crept onto the inside (ooops) but that sort of adds to the effect! 🙂
This one ended up nothing like the idea I had in my head, but I was pleasantly surprised with the result. What do you think?
xx Cheryll

Love your beautiful card. I love doodling. It always looks so cool. Thanks for sharing and also for the quick video on making spritzers.
Thank you Sibylle …I don’t doodle anywhere near enough on my projects, but I was really pleased with this one. Thanks for stopping by and leaving a comment! xxx Cheryll
What a beautiful card Cheryll! I love the pop of white and the doodling really works well too! 🙂
Thanks Tracy! Doodling does not usually = Cheryll, so this was something different for me.
What a beautiful card Cheryll very stunning , I love how you used the two colours on the card base using the spritzer, it is so different
Thanks Colleen, yes I was very happy with the end result for this one. xxx